
how to CREATE A FAULT REPORT
| You create a fault report form by entering a fault onto your host Reporting Tool. |
| You
create a Fault Report form by: |
|
|
|
Selecting CREATE FAULT from the eCo.Repair Menu Bar. |
| and the following window will
be displayed: |
|
 |
The type of circuits or faults you can enter
is dependent upon your user profile. Warning messages will be displayed if the boxes in the Preliminary Checks are not confirmed. |
| Notes: | ||
| 1. | To utilise this functionality you will require additional permissions on your eCo.Repair account. | |
| 2. | The fault report options displayed will correspond to your access permissions. |
 |
| how to CREATE A PRIVATE CIRCUIT FAULT REPORT |
|
A private circuit is a line dedicated to a company exclusively
for their use. Note: You CANNOT create a fault on a private circuit which currently has a loop applied. |
| Enter the following: |
| 1. | A valid circuit number. |
|
Note: If you enter a circuit
number which is not in the correct format the following message is displayed:
“The format of the circuit you have entered is not recognised” |
| 2. | Confirm both the preliminary checks. |
| 3. | Select the Accept button. |
| If you do not confirm both settings in the Preliminary Checks window, one of the following warning messages will be displayed. |
 Indicates that the customer’s equipment has been checked and is not faulty. |
||
 Indicates that the customer’s power supply has been checked and is not faulty. |
||

Indicates that the customer’s power supply and equipment has been checked and both are operating correctly. |
||
| 4. | Select the OK button. |
| Note: You must confirm the message displayed before you will be able to proceed with the Create Fault Reportform process. | |
| While eCo.Repair is searching and validating the circuit details relating to the fault number entered, the following window is displayed: |

| Note: To view and
complete the structure questions select the |
| If your Private Circuit has been validated and there is NO open fault logged against the circuit: |
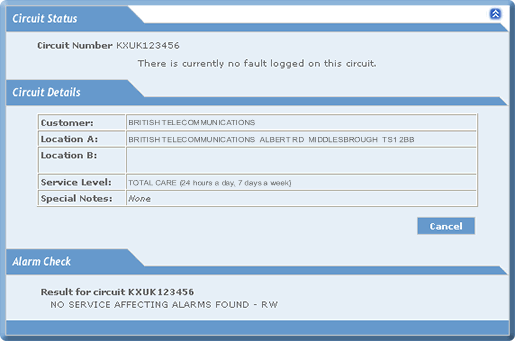
| Notes: | |
| 1. | The Circuit Details and Alarm Check windows are automatically displayed if circuit details exist or an alarm checks has been run. |
| 2. | For further information about alarm checks see how to CREATE A PRIVATE CIRCUIT, Alarm Checks. |
| 3. | To view and complete the structure questions
select the |
| 5. | Select either the : | |
|
§
|
Cancel button to return to the Create Fault Report window. | |
|
§
|
||
| If your Private Circuit has been validated and there IS AN open fault and a major sevice/network outage is logged against the circuit: |

| A Major Service/Network Outage message is displayed if an outage exists on the circuit |
|
| as this may affect the completion
of the fault on the circuit. The message displayed will indicate that BT
has recogned the incident and is dealing with the problem. Note: A Major Service/Network Outage fault cannot be viewed by the customer. If the customer requests to view the fault, it can can be made 'live' by completing the details in the Make Live window. |
|
| To make a fault 'live': |
| 6. | Enter in the Make Live window: | |
|
§
|
Your Name. | |
|
§
|
Your Telephone Number. | |
|
§
|
Your Fault Reference. | |
| 7. | Select and drag down the slide bar until the
Create button is displayed.
|
| 8. | Select the Create button. |

| 9. | Select the highlighted continue
text. On selection of the text you will be returned to the Create Fault Report window. |
| To answer the structured questions: |

| 10. | Select the |

| Note: To return to
the Circuit Status window select the |
|
You will be presented with a number of Structured
Questions. Your answer to each Structured
Question will effect the next question displayed
plus the method of entering information. |
| 11. | Answer all the questions and input your replies by either: | ||
|
§
|
selecting the radio button. | ||
|
§
|
selecting from drop down menus: | ||
 |
|||
|
§
|
selecting from drop down menus: | ||
.gif) |
|||

|
 |
||
|
§
|
Selecting the Submit button: | ||
|
§
|
Using menu selection: | ||

|
|||
|
§
|
Entering text and selecting the | ||
 |
|||
| You can return to a previous question by selecting
the |
As you answer the questions your replies will
be displayed at the base of the window:
|
| Note: You can view all your answers by using the scroll bar to the right of the form. |
If your responses to a particular question causes
the fault creation process to be abandoned the following error message will
be displayed:
|
| If your response cause the creation process to
be abandoned, below is a sample of messages that may be displayed beneath
the Fault Cannot Be Created heading: |
|
| Creating fault from non-live. | |
| Please check circuit number and re-report | |
| Endpoint for product specific Endpoint. | |
| This circuit is part of a major indident. | |
| Please contact your provision team - this circuit has not been commissioned. | |
When you have answered the last question page the Structured Questions History window will be displayed. It will show details of all Structured Questions answered by you. |
| 12. | Select the Continue button. |
| After the Structured Questions History
window, the system checks for some mandatory answers. If the answers are
present in the structured questions, the fault gets entered into the system. However if the answers are not present then the Fault Report Form is displayed: |
%20Window1.gif)
|
| Note: The Fault Report Form window is displayed only if any questions present in this window remained unanswered previously. |
| 13. | Select from two drop down menus: |
||
|
§
|
Can BT take this circuit out of service for testing? |  |
|
|
§
|
Has this circuit ever worked? |  |
|
| 14. | Under Contact Details enter your reference number. |
Note: The Contact Name and Telephone number is automatically populated. |
|
| 15. | Enter the Fault Details: | |
|
§
|
A description of the fault. | |
|
§
|
If intermittent, one directional or erroring provide information about the frequency, date and time, direction of failure etc. | |
|
§
|
Time of failure. | |
|
§
|
Other relevant information. |
|
| Notes: | ||
| 1. | Only 250 characters can be entered in this field. | |
| 2. | If you select the Help button to the left of the Fault Details windows, further information about the type of details which can be entered is displayed. | |
| 16. | Enter the Site Access Details for the A end and B end: | |
|
§
|
Contact names and telephone numbers. | |
|
§
|
A-B end access times. | |
|
§
|
Additional
information. |
|
| Note: Only 150 characters can be entered in the Additional Information. | ||
|
17.
|
Select from the drop down menu:
|
||
|
§
|
Receive updates about fault progress?
|
 |
|
| Note: The Conditions button displays the eCoRepair Support telephone number. |
| 18. | Select the checkbox if you wish to Create
a Report for another Circuit affected by this fault? |
| Notes: | |
| 1. | If you check this box the Multiple Fault Report will be displayed for completion after the Accept button has been selected. |
| 2. | For further information about Multiple Faults, see how to CREATE A PRIVATE CIRCUIT, Multiple Fault Reports. |
| 19. | Select the Accept button. If you select the Cancel button you will be returned to the Create Fault Report window. |
| Note: When you select the Accept button you fault is entered onto the system. | |

| When your Private Circuit fault report has been created: |
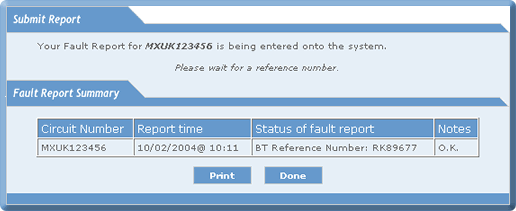
| Once your Private Circuit fault report has been created the Fault Report Summary window appears displaying a BT reference number. |
| 20. | Select the Print button to obtain a hard copy of the information displayed. If you select the Done button you will be returned to the Create Fault Report window. |
| If the circuit number entered has a fault currently open the following windows are displayed: |

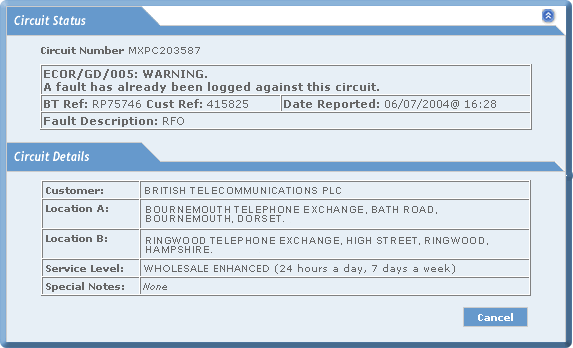
| If there is a A Major Service/Network Outage against the circuit a message is |
|
| displayed as this outage may affect
the completion of the fault on the circuit. Note: A Major Service/Network Outage fault cannot be viewed by the customer. If the customer requests to view the fault, it can can be made 'live' by completing the details in the Make Live window. For further information, see how to CREATE A PRIVATE CIRCUIT FAULT REPORT, section which describes a Private Circuit with an Open Fault. |
|
|
1.
|
Select the Cancel button to be returned to the Create Fault Report window. |
| If a circuit number is found to be invalid, eCo.Repair will display one of the following warning messages: |
 Indicates not in the inventory. |

Indicates no details could be found. |
 Indicates there is not inventory code. 
Note: When you create a fault, if any known Planned Engineering Works is assigned to the circuit, an alert will be presented for a period of 15 minutes before the planned work and up to 2 hours after the scheduled completion. |
| When you are creating a private circuit, alarm checks are only run if there is no fault logged on the circuit and the circuit is digital. |

| When the Alarm Check process has been completed the following window is displayed: |
| Select the |
| This window will be displayed if you have checked the Create a report for another circuit(s) affecting this fault? |
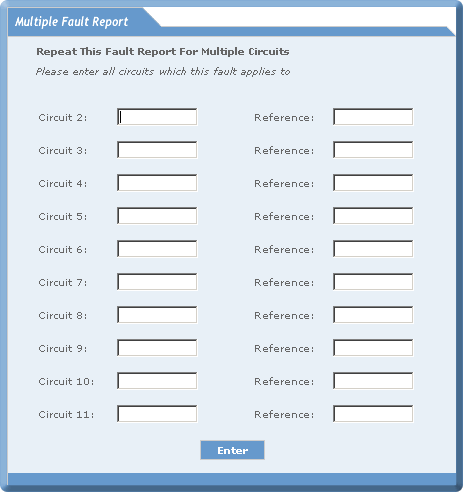
| Enter: |
|
| 1. | The circuit numbers. |
| 2. | The reference details. |
| Notes: | |
| 1. | The details entered in the previous form will be applied to each of the additional circuits that a fault is being reported against. |
| 2. | The reference may be changed at this stage for any circuit if a different reference is required. |
| 3. | Select the Enter button. |
|
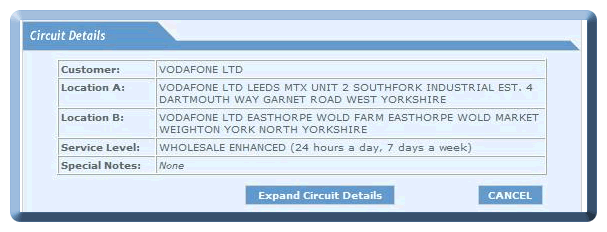
Below the circuit details the expanded view of the circuit details will be availble.
|
| Click on the Expand Circuit Details button to the expand the Circuit details view. The new tab "Expanded View" will be displayed. |
|
The expanded view displayes the details like Circuit Speed, Local Network Technology (For A & B end) and Bearer circuits ( for A & B end).
|
| The expanded view for the circuits with prefix "MX" is |

| The expanded view for the circuits with prefix "NX" & "KX" is |

| The “Click Here” link in the above pictures will refresh the Technology Type information. This brings the latest technology type information from the database and displays here. |
| The “Hide Expanded View” button makes the Technology type information invisible. |

| Nov 2008 Issue 08.11 eCo.Repair Version 6.0 |
|
© British Telecommunications plc 2009
|